Art & Craft, DIY ideas and Tutorials – Craftbuds
  • About Us
  • Needlecraft
    • Crochet
    • Knitting
    • Quilting
    • Sewing
    • Embroidery
  • Cricut
  • Jewelry Making
  • Paper Craft
    • Origami
    • Drawing
  • Engraving
  • Collectibles
    • Numismatics
43K Followers
25K Followers
1K Subscribers
Subscribe
Art & Craft, DIY ideas and Tutorials – Craftbuds
  • About Us
  • Needlecraft
    • Crochet
    • Knitting
    • Quilting
    • Sewing
    • Embroidery
  • Cricut
  • Jewelry Making
  • Paper Craft
    • Origami
    • Drawing
  • Engraving
  • Collectibles
    • Numismatics
  • Craft
  • Food

Frosting Cupcakes: How to Use a Pastry Bag

  • Lindsay
  • Posted: February 2, 2012 - Updated at: August 1, 2020
Total
0
Shares
0
0
0

How to Decorate Cupcakes Tutorial

If you want to frost cupcakes like a pro, it just takes some simple tools and a bit of practice! To decorate cupcakes with homemade icing, you’ll need:

  • A plastic pastry bag
  • A large round or star-shaped piping tip for frosting your cupcakes
  • A smaller round tip piping tip for details
  • Cupcakes and stiff icing (I used Wilton’s buttercream icing recipe)
  • Food coloring if desired

Frosting Your Cupcakes

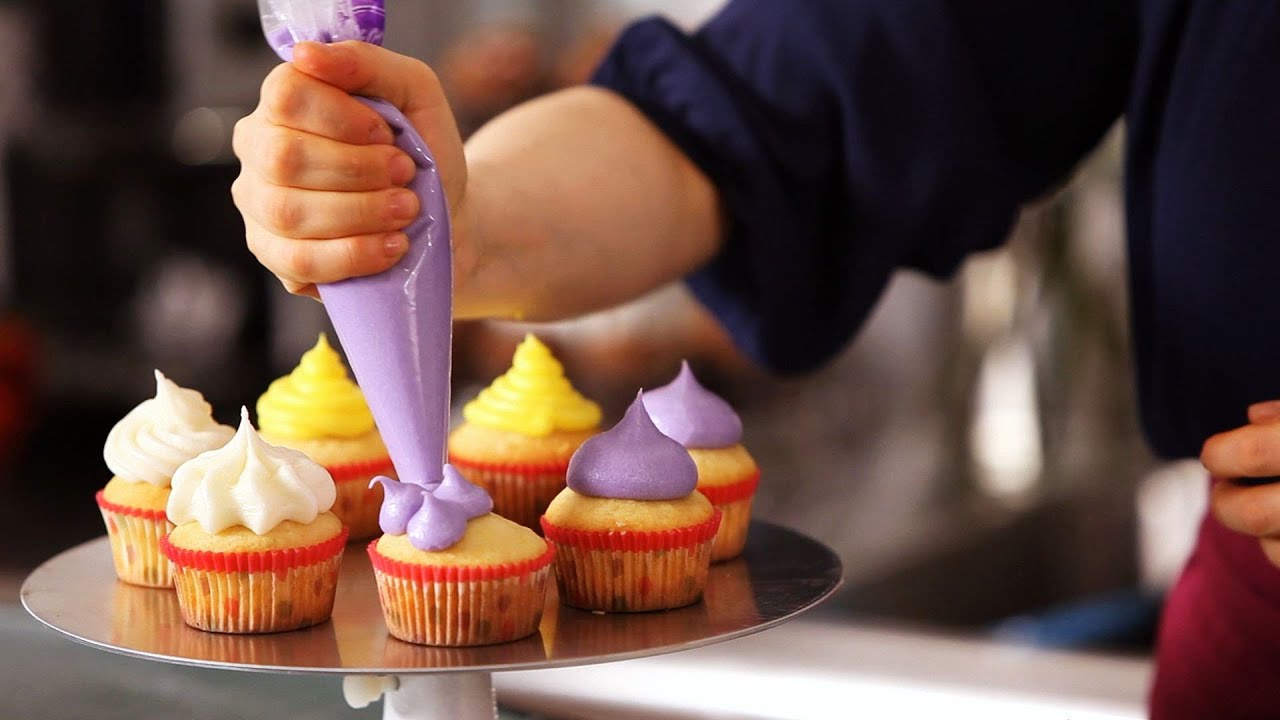
After your cupcakes have cooled to room temperature, prepare your pastry bag by snipping off 1/4″ of the tip with scissors. Insert your silver tip (large hole), inside the bag, so the tip pokes through. Use your hand to push it down snugly inside the bag.

Pastry bag and tips

Fold down the outer edge of your bag around your hand which holds it. Fill your bag with prepared frosting. Spoon frosting inside your bag, knowing you can always add more later. Unroll the top of the bag, and twist to make sure no frosting can escape the wide end of the bag. Push frosting towards the tip.

Fill the pastry bag Fill bag with frosting

Starting in the cupcake center, use your hands to squeeze a dollop of frosting through the tip, then release. This will create a higher level to build the icing on in your next step.

How to frost a cupcake Dollop of icing

Starting at the cupcake edge and moving clockwise, use your hands to apply a continuous stream of icing. Spiral your icing to the inside of the cupcake, building on top of the dollop from before. When you’ve covered the entire cupcake, release.

How to frost a cupcake Frost cupcake with pastry bag

Tip: When you’re not frosting the cupcakes, set your bag down on the table. The heat from your hands will make the icing soft and droopy if you keep holding it the whole time.

To add texture with frosting, start in the center and squeeze the bag with your hands, quickly releasing as you pull the pastry tip away from the cake. A star-shaped tip can create small frosting flowers, while a round tip applies frosting smoothly. Pastry bags may be washed and reused just like the tips.

Football cupcake

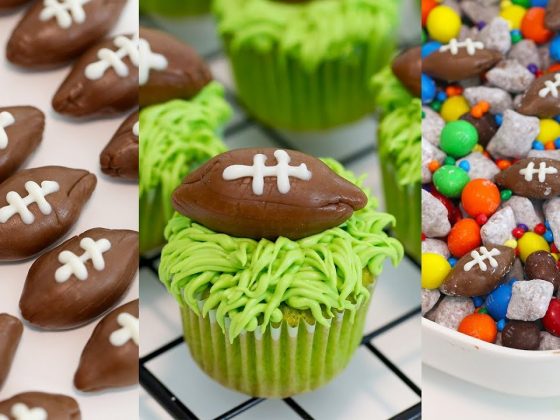
You can also make football cupcake toppers for your Superbowl party or sports-themed birthday party. Rather than buying fondant, you can use soft, chewy candy from your candy dish like Tootsie Rolls, Laffy Taffy, Starburst, or Airheads!

Pin It

Total
0
Shares
Share 0
Tweet 0
Pin it 0
Related Topics
  • cupcake frosting
  • Cupcake icing tutorial
  • cupcakes
  • cupcakes recipes
  • decorate cupcakes
  • decorate cupcakes tutorial
  • decorating cupcakes
  • decorating cupcakes ideas
  • frosting cupcakes
  • frosting for cupcakes
  • how to decorate a cupcake
  • how to decorate cupcakes
  • how to frost a cupcake
  • how to frost cupcakes
  • how to ice cupcakes
  • how to make cupcakes
  • icing cupcakes tutorial
  • pastry bag
  • piping icing tutorial
  • wilton cupcakes decorate
  • wilton icing recipe
Lindsay

Hi, I’m Lindsay Conner, an author, modern quilter, editor, and founder of the Lindsay Sews blog. I’m a Baby Lock ambassador and Stash Books author who loves writing modern sewing and quilt patterns for beginners and weekend sewists! I live in Indianapolis, Indiana with my husband, son, and two loveable cats, Murph and Chloe. I’ve been crafting for as long as I can remember. As a kid, I saved my dollar bills for trips with my mom to Jo-Ann Fabrics, where I’d find new floss for friendship bracelets or mini cross-stitch kits. Because my mom has always shared my love for crafting, she bought me my first sewing machine, a Hello Kitty Janome.

Previous Article
  • Giveaways
  • Product Reviews
  • Uncategorized

Book Review + Giveaway: Sew What! Bags

  • Lindsay
  • Posted: February 1, 2012 - Updated at: January 9, 2022
View Post
Next Article
  • Craft
  • Food

Superbowl Recipes: Candy Football Cupcakes

  • Lindsay
  • Posted: February 2, 2012 - Updated at: August 1, 2020
View Post
You May Also Like
View Post
  • DIY projects
  • Home

nPhoto – Professional Photo Printing Services for Photographers: Develop Your Brand with Us!

  • Jeremie Berton
  • Posted: January 14, 2025
View Post
  • Craft
  • Outdoor

5 Great Destinations in Costa Rica for Your Next Crafting Retreat

  • Craftbuds Editorial Team
  • Posted: December 16, 2024
Why-Professional-Locksmiths-Are-Essential-for-Home-Security
View Post
  • Home

Avoiding DIY Disasters: Why Professional Locksmiths Are Essential for Home Security

  • Jeremie Berton
  • Posted: April 3, 2024
Putting Together a Wooden Nativity Set for the Holidays
View Post
  • Craft
  • DIY projects
  • Home
  • Outdoor

Putting Together a Wooden Nativity Set for the Holidays

  • Sheila Mae Pedregosa
  • Posted: February 7, 2024
How is AI Impacting Crafting
View Post
  • Craft
  • Tools & Supplies

How is AI Impacting Crafting

  • Craftbuds Editorial Team
  • Posted: December 5, 2023 - Updated at: December 7, 2023
How Funny Phrases on Shirts Have Transformed
View Post
  • Craft

The Evolution of Humor: How Funny Phrases on Shirts Have Transformed 

  • Craftbuds Editorial Team
  • Posted: October 23, 2023 - Updated at: October 24, 2023
Craft Organizers for Efficient Storage Use
View Post
  • Craft
  • DIY projects

DIY Craft Organizers for Efficient Storage Use

  • Craftbuds Editorial Team
  • Posted: October 23, 2023 - Updated at: October 25, 2023
make-christmas-more-special-for-your-loved-ones
View Post
  • Craft

5 Ways to Make This Christmas More Special For Your Loved Ones!

  • Craftbuds Editorial Team
  • Posted: September 28, 2023
2 comments
  1. Katy says:
    February 3, 2012 at 7:15 am

    Ooh, great tips. I’m normally the dork slapping icing on with a spoon, I really should try to do it properly some time!

Leave a Reply

Your email address will not be published. Required fields are marked *

Subscribe

Subscribe now to our newsletter

Art & Craft, DIY ideas and Tutorials – Craftbuds
  • About Us
  • Editorial Guidelines
  • Our Experts
  • Privacy Policy
  • Contact Us
Find fun and creative craft ideas and tutorials across various categories such as Knitting, Quilting, Sewing, PaperCraft, Jewelry Making and much more

Input your search keywords and press Enter.