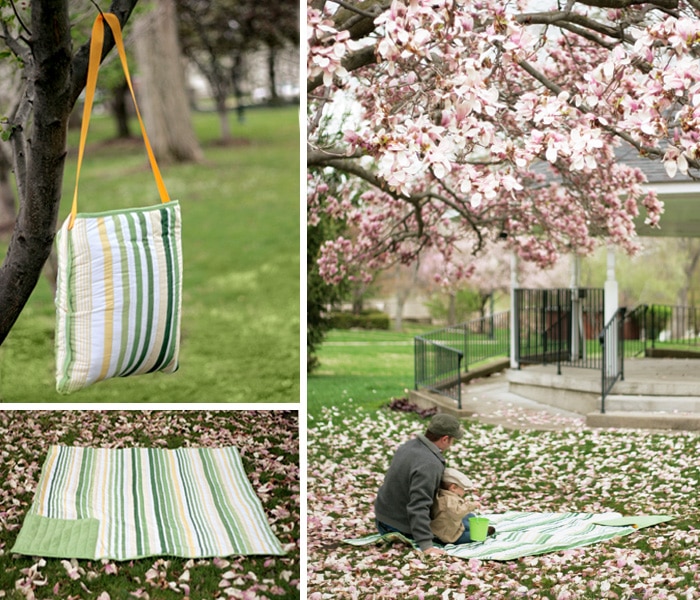
With Spring just around the corner I’m getting ready to enjoy family picnics and being outside again (finally!). I wanted to make a picnic blanket that was waterproof on one side and easy to store so I came up with this design. This would also be great for the beach and keeping the sand out of your blanket! It features a shower curtain or vinyl table cloth on the bottom, a blanket on the top, an attached pocket that the whole blanket folds up into, and an easy-to-carry shoulder strap tote bag blanket.
Materials:
-
1 heavy-duty vinyl shower curtain with magnets, patterned or clear–mine was 71″ x 70″ (if you get the type with suction cups on the sides they’ll show up in the final blanket). I also tried this with a vinyl table cloth which looked really cute but was not as durable.
-
1 twin XL blanket, washed and dried–the one I used was 92″ x 63″
-
45″ shoulder strap (or whatever length feels comfortable for you)
-
sewing machine and lots and lots of pins
Step 1
Cut off the bottom of the blanket so it is now 73″ x 63″. You’ll now have a scrap piece that’s 19″ x 63″. If you’re not using a twin XL blanket you’re going to start with a basic rectangle of 71″ x 60″. Add 2″ to each side that will you cut with a raw edge and 1″ to each side that you cut with a finished edge because the finished edges you only fold over once in step 3 and the raw edges you fold twice.
Step 2
Trim off the top of the shower curtain and the bottom with the magnets so it’s 60″ tall (and still the original 71″ wide). I took photos but with this being so large a project I decided that drawn diagrams would be more helpful!
Step 3
Make the pillow piece: Cut a piece 18″ wide x 16″ tall from the scrap blanket fabric to use for the pillow. One of the 16″ sides should be the finished blanket edge (which will be the top of the pillow opening). Hem the 3 raw edges of the pillow by folding the edges over twice, 1/2″ each fold. The pillow piece should now be 16″ wide x 15″ tall. Then fold under the ends of the strap to prevent fraying and sew the strap onto the sides of the fabric.
Step 4
Position the pillow in one of the corners of the blanket that has finished edges. Place it 1″ away from the edges and sew around the sides and bottom.
Step 5
Now you have a blanket with a pillow pocket that is 73″ x 63″ and a shower curtain that is 71″ x 60″. Center the shower curtain 1″ away from the finished top and sides of the blanket and there will be an extra 1″ along the raw edge. Fold the extra 1″ inch of the blanket over the shower curtain and pin down. At the raw edge, fold over twice and pin down.
Step 6
Sew around the entire blanket using a larger stitch to avoid putting too many holes into the vinyl.
Step 7
Fold your blanket up into the pocket and you’re ready to impress everyone at the park! To fold the blanket, lay it flat with the vinyl side up then fold it in half lengthwise, then in half again. Turn the pocket inside out so the strips you just folded are now inside the pocket. Fold the strip above the pocket in half, then in half again, then stuff it in the pocket. Now your blanket is easy to store and carry and even doubles as a pillow!
And here’s how the folding technique looks in real life:

Additional notes:
- When the blanket is open you can hide the strap inside the pocket. The pocket can also double as storage and makes a great spot to stash napkins, disposable plates, and other items that blow away at a picnic.
- If you’re not going to be outside on wet ground this would be even easier without the waterproof layer.
-
An all fleece version of this would be fun for kids for road trips, a fun, and functional pillow to have on the couch, or great for sports fans. It would double as either a seat cushion or a blanket!
-
The fluffier the blanket the harder it is to stuff it into the pocket so thinner or single-layer blankets work best.
-
The blanket would be easier to fold if you stitched along the fold lines. I was hesitant to try this with the vinyl backing because all the holes would make it less durable. But it could be a good addition to a non-waterproof version.
-
Rather than folding the blanket edge over the vinyl side, you can also use bias tape. Or you can remove the binding from your blanket and then stitch it back on once the vinyl is pinned down. It looks nice but it’s a lot of extra work and maybe not worth it, trust me.


53 comments
This is an amazing tutorial! Thank you. I was thinking of making this type of blanket, but I didn’t think to make it into a tote!
Awesome idea! Thanks for the tutorial!
Ooooohhhh…really like this! So many possibilities! Thanks for the tute!
Such a clever idea! I can’t wait for picnic season.
What a fabulous tutorial! I’ll be sharing a link in my Saturday Seven lineup tomorrow.
Great idea! Thanks for sharing the tutorial!
Your photos are spectacular, and this project is fantastic! Thanks so much for sharing.
I was just thinking of trying to make one of these last week! Thanks so much for the tutorial!! I’m your newest follower 🙂
I’m hopping from Wildflowers and Whimsy, I think your idea is awesome!!! Thank you so much for sharing this tutorial:)
Ohhh I’ll be staying here… I want to read more of your inspiring ideas!!
Eleni @ sewhappiness.blogspot.com
Hey there I am your newest follower! Hope you stop by to see me. Your blog is way too cute!!
https://bestpartofbelieveis.blogspot.com/
&
https://nikkisniknacks.blogspot.com/
~Nikki
Awesome tutorial! Thanks for linking up to Sew Crafty Saturday !
! Sharing this on Wildflowers & Whimsy’s Facebook page
What a genius idea to use the shower curtain!! Thanks for sharing! I love this picnic blanket and will keep it in my folder!
Thank you for this awesome tutorial! This would be so great to have on hand, for all kinds of impromptu trips to the park, beach, ect… I wonder though, would it be washable?
This is so cute!!!
I love how it folds up!!!
This is a great idea! Oh, I wish I could sew!
omg, i want one!! i see myself making this before the fall!
Good question Vanessa! The one I made got a little dirty during our photoshoot and I just let it dry out and was able to brush the dirt off. I haven’t tried it yet but when it needs washed I’m considering rolling the blanket up with the vinyl shower curtain on the inside, washing it on the lowest/coldest setting (our washing machine has a “handwash” setting) and air drying it. Ours won’t need washed all that often (once a season?) so I could also hand wash if necessary. If you’re expecting to use and wash the blanket a lot it might be best to skip the waterproof backing.
Thanks for sharing! I will have to find someone to make this for me! LOVE IT!!!
Kindest regards,
Jennifer Ferrell
This is such a great idea. I have something similiar that I purchased from a store, but I love the idea of making my own, how I want it. Thanks so much for sharing. (I stumbled upon your site through Tip Me Tuesday).
~ Dawn
~https://dawnsdesignsthatdelight.blogspot.com
I love this idea. My husband and I are avid picnic-ers. But, the frustrating part is packing up the blankets and how they’ll get wet/dirty. I want to make this soon because it will make our date nights much easier.
I’m following you from the Sugar Bee Craft linking party. Please follow me at: http://www.daughterbydesign.blogspot.com
Love it! Only if I knew how to sew!
wow! umm love love love this! I want to try it. your tutorial and pictures are great. awesome blog.
new follower!
kathryn
http://www.thedragonsfairytail.blogspot.com
Great tutorial and great idea! I plan on featuring this on my blog tomorrow for a gift idea round up. Be sure to come by and check it out! http://www.icantstopcrafting.blogspot.com
This definitely makes picnicking look more appealing. Love the idea of just grabbing this and heading out the door. Thanks for sharing. 🙂
Love your idea! How do you create such great graphics for your tutorials?
Please stop by my blog this week, before Sunday, and post a link of gift ideas for the moms in your life. Winner of the random generator chooses a craft book to be mailed to them! https://the4rsRamblings.blogspot.com and I would be honored if you would add me to your linky party collection!
I saw something similar to this in a catalog last week and have been looking for a pattern to make my own ever since, Thanks so much for sharing!!
This is such a fantastic idea! Thanks for sharing such a detailed tutorial, definitely on the to do list!
Thanks, I’m glad you enjoyed the idea and the graphics! I use Adobe Illustrator to create them. It’s a great backup option for when photos aren’t working or in this case, the project was just too large to photograph well. Feel free to use the “contact” button above to e-mail me if you want any details about the program. We’ve added your linky party to the list for Sunday!
LOVE THIS! Super simple and with GREAT instructions, I’m for sure making this!
This is such a neat idea!! Very practical 🙂
Thanks for linking up to Your Whims Wednesday!
This is such a wonderful project! Your tutorial is absolutely awesome too!
I love using shower curtains in sewing projects. Smart idea!
Thanks for linking to Creative Juice. Hope to see you back again this week…
it’s cute. i the link to ur tutorial in my blog. hope u don’t mind. TQ
Hi there! I just wanted to let you know I featured this tutorial, with a link to this post, on my blog at:
https://sewlindsaysew.wordpress.com/2011/06/11/sunny-summer-sewing-projects/
Thanks for sharing this magical tutorial!
Hey, thanks Lindsay! And awesome name 🙂
This is simply amazing!What a great tutorial!I’m visiting from 101 summer sewing tutorials roundup. Have a great day! https://runwithglitter.blogspot.com
Thank you so much for giving this PRESENT to me!!!!! I really LOVE this project, I will some way or other make it & ENJOY it. Then I will remember you each & every time I use it as me & my husband will be going on PICNICS very often !!!!!Hope to see more Projects like this in the near future.
I have been looking for a pattern like this for a couple of years. I saw the non-waterproof version once and have been looking for a pattern. Now I have instructions AND a great tutorial! Thanks so much for your effort to post this for us!!
loved your idea can”t wait to try it.
I know that my shower curtain is often washed in our washer (to get soap scum, etc off) so I don’t see why you couldn’t put it in the washer if you were careful with it!
Good to know Krista, thanks! I’ve never even thought about doing that (I always wipe ours down with a Mr. Clean magic sponge) so that’s a great trick to know both for the picnic blanket and for the one in our shower!
I have made several w/o the vinyl, a long time ago but never thought to add the strap. You did a wonderful job explaining how to do it, and you had great drawings and pictures, thank you.
Another “Why didn’t I think of this?” What a great idea. Thanks so much for the tutorial. Pictures always help me. Show and tell!
I often throw my shower curtain in the washer with a load of towels to get soap scum off so I think it would work ok. I was wondering tho, if this same thing would work with some other sort of slick material on the one side a table cloth or shower curtain in the middle and a sheet on the top side? The slick material would be great in sand and grass to keep things from sticking while the shower curtain part would be great to keep moisture from coming thru? Just an idea, What do you think. May be difficult to keep everything lined up and pinned to sew though…?
Sounds like a good idea Kerri! Like you said, it might be hard to keep the layers all lined up. I know sewing the shower curtain was a bit awkward for me since it’s so large and kind of stiff but I’m sure it’s possible!
This is an amazing ideal.
This is a good basic whole cloth quilt! I really like the pocket being in the corner instead of the “quillow” method of puttin it in the center on an edge because there are fewer chances of getting it out of alignment. This could be made of the canvas used in outdoor chair covers,too. I think there will be some of these in my family’s summer baskets! Easy peasy! My kind of quick project!
I have two shower curtains extra so now a new idea. this would also be handy for kids or adults to sleep on who have “tinkle” problems and not so obvious as a leak proof pad. Thanks
I did something like this for our boat. I used vinyl & beach towels. This way when the seats were wet & people not in swim wear – put the vinyl side down & the towel side was also cool to sit on.
I’ve been wanting to buy one of these but I’d rather make one myself. Couldn’t think of what to use for the waterproof side so am loving this idea. I’ve read that reviews of purchased ones and hear they can be slippery when walked on. So instead of sewing on the fold lines I’m going to try fabric glue to see if that holds things together without all the extra holes. Thanks for a really great idea. And for those of you who can’t sew, fabric glue might work for the whole project.
Just yesterday I finished making a beach towel tote using the same idea and was wondering how to make a blanket!! Your tutorial is just what I needed. As for the baking, I think it is an excellent idea although you can get a shower curtain that looks like fabric but is waterproof and sews up very well…I made curtains for my bathroom window as my very 1st sewing project and it was really very easy. scariest part was cutting it shorter!!! LOL! TFS
I have made several beach towel totes, but my daughter just asked for a tote for picnics with a tablecloth. Thanks so much for answering her wish. LOL Applegirl
Thanks just what i need when i take my twin grandsons out this summer, they love picnics and its so easy to carry