Before we get started, here’s a bit of my thought process on creating this design. I wanted something to help organize the diapers/wipes/changing pad in a diaper bag. I wanted it to be something that could be easily taken out of the diaper bag to go on a walk or just to take into the bathroom. And I wanted to be able to get to either the wipes, the diapers, or the changing pad without having to open up the entire pouch. I looked for existing tutorials but everything I found was either just a pouch for diapers and no changing pad, or the changing pad was the pouch so it had to be opened up to get anything out. So I came up with this design that has a large pocket for a few diapers and a wipes package/case with a small outer pocket for a changing pad. This changing pad has a waterproof side that can be easily wiped up.

Changing Pad
Cut a rectangle 24 x 14 out of your top and bottom fabrics, and a slightly smaller rectangle out of fusible web like Wonder-Under (affiliate link), which I’ll refer to as WU, about 1/8″ smaller on all sides. In this photo I originally used fusible fleece so there would be a little padding. But I discovered that when it’s folded up it’s just too bulky so halfway through I changed over to the Wonder-Under fusible web. I used a home-dec weight fabric (the elephants) and a blue flexible wipeable fabric (technically called PUL-polyurethane laminated fabric). The blue PUL is soft on one side and plastic-ey wipeable on the other side. I like that it’s really flexible and easily folds up without getting crinkly or sticky like vinyl.

Next I ironed the WU to the elephant fabric then peeled of the backing. Then I placed these 2 layers on top of the PUL and ironed the elephant side again. I couldn’t iron from the PUL side since it would melt but doing it this way worked fine.

Once my 3 layers were fused together I traced the curve of a bowl in each corner for rounded corners.

After cutting out the rounded corners I stitched 1/2″ bias tape around the whole thing and that was it! One cute, custom, changing mat. If you’re worried the fabric layers aren’t going to stay together when adding the bias tape you may want to stitch around the outer edges first.


Diaper Pouch
We’ll begin with prepping the pocket. Cut out a square 9 1/4″ x 9 1/4″. Fold all 4 edges under twice, 3/8″ per fold. Iron the folds down so they stay in place. For now we’ll just finish the top edge of the pocket so stitch along the top of the rectangle 3/16″ in from the edge.

Now put that aside for a moment while we work on the pouch. Cut two strips of fabric 21 x 8.5. Put right sides together and sew down the sides with a 3/8″ seam allowance.

Turn right side out, fold the ends inside 1/2″ and stitch them closed about 3/16″ from the edge.

Next, fold the strip in half and crease or mark with a pin so you can see the center. Pin your pocket into place. Then stitch along the bottom edge of the pocket 3/16″ from the edge. The sides of your pocket are still the folded edge that hasn’t been stitched.

Next, fold the strip in half with right sides together. As you’re looking at the photo above, you would be folding the left side over top of the right so your pocket is on the inside. Stitch along the two sides 3/16″ from the edge. Then turn right side out and you have your diaper pouch with changing pad pocket! Here’s a view of both sides. This is a forgiving pattern so if you’re a little off on any of the seam allowances it shouldn’t be a problem.

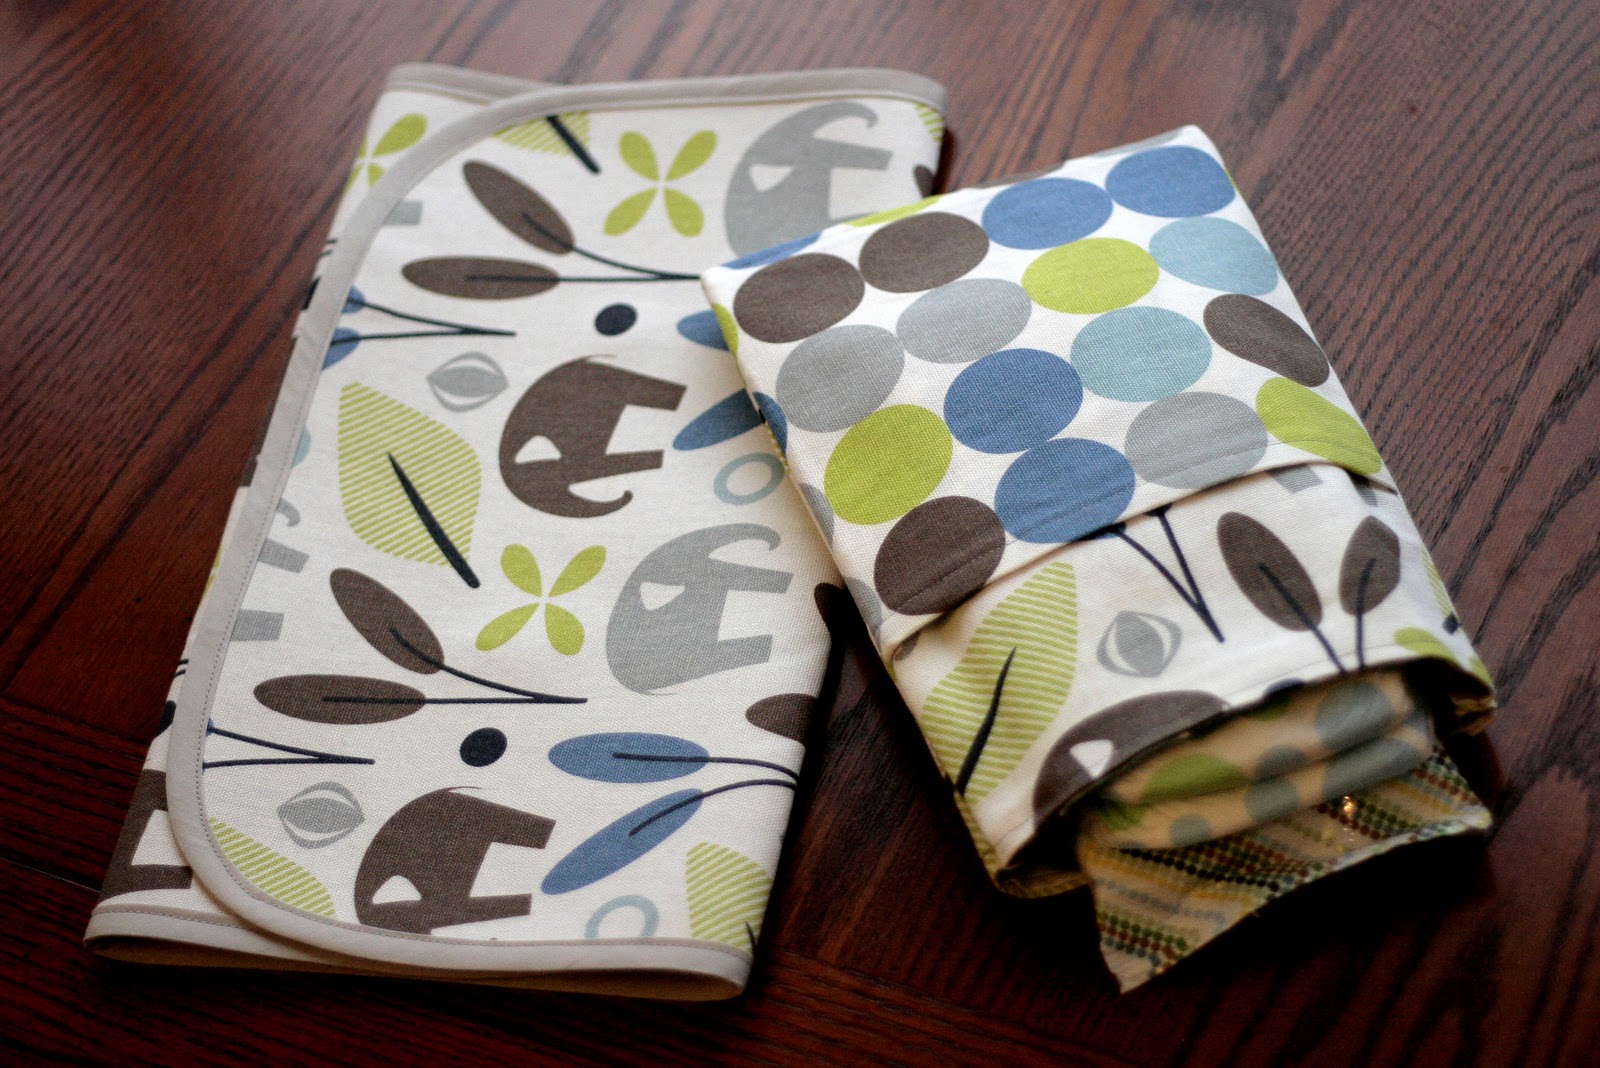
And here it is filled with diapers and wipes and the changing pad in the outside pocket. I folded the changing pad into thirds horizontally (like the top photo) then into thirds again to fit into the pocket.

And if you need more ideas, you can find my instructions for matching appliqued onesies here!


54 comments
>I just wish my kids were still young enough to require such great accessories! — Hollie
>Very cute! I love the patterns you chose! :0)
>This looks great! I love the practicality of using a bowl to round off corners, rather than cutting out a pattern. 🙂
>Thanks for the tutorial! I have been seeing these lots of places and really want to try to make one soon!!
>Nice design Mary!
>I want one and I want to make one for every new mom I know!
>Love the fabric, Mary! Also love your thinking…I often grab just what I need from the bag to visit to changing station – great design!
~cherilyn
>This is beautiful! I LOVE the fabric.
Wow! This is a great little project. I will keep this in mind for upcoming baby showers. Thanks for sharing!
Where do you find the PUL fabric. I really think my daughter would love this.
Thanks Kim! I bought it at JoAnn Fabrics. If you need to buy it online, it looks it’s currently being sold at fabric.com.
I was just searching for something like this the other day! I wanted something small and compact that I could just grab and toss in my purse but was unable to find just the right size..this is perfect and the tutorial is nice and easy to follow..thanks!
I LOVE this so much=)! i am for sure going to make it thanks so much =)
love this! made this for a friend’s birthday last month and it’s really great. You can see my version at https://www.hennymats.blogspot.de/2012/07/sewing-changing-pad-first-time.html
Thank you so much for sharing!
Love this, thanks for a great tute! Can I ask what a wonder Under is? We have different brands here in Ireland! Is it a fusible fleece or similar?
Hi Sarah! Wonder Under is a paper-backed fusible product that you can use to adhere fabric/applique. It’s not thick like fusible fleece–a thin layer of iron-on stickiness, basically. 😉
Thanks for figuring out all the dimensions, how to stitch it so easily, and for sharing it. I appreciate it.
Thanks Lindsay 🙂 So is it basically like Bondaweb or some other fusible or is it a bit different?
Hi Sarah, I haven’t heard of Bondaweb, but the Wonder Under was a fusible web so it sounds the same? You can see it at https://www.joann.com/pellon-805-wonder-under-fusible-web-17-w-x-35yds/prd14664/ on JoAnn Fabrics site. I should have been more specific in the instructions so I’ve changed them to now refer to “Wonder Under fusible web”.
Thanks Mary, I had a look, looks like pretty much the same product. Brill. I love this, its top of my list for things to make before my new baby arrives and I get no time to sew!
Did you get your elephant and dot fabric at JoAnn’s as well?
Yes, but it was awhile ago so I’m not sure if they still carry it!
Love the set and have exact fabric! Can the HD fabric be washed in a machine? Never used Pul before..would pad then have to be air dried or is it dryer safe?
Sure appreciate your time. Thank you!
Hi Joyce! I’ve had no problems washing home dec fabric in a washing machine and drying it (it will shrink some). I’ve never tried drying PUL before so I’m not sure if it’s dryer safe. I know it’s used for making certain cloth diapers so it may be safe to dry on a low heat setting but I can’t guarantee that!
This is the neatest thing! I haven’t seen them anywhere, nor heard of them, but I had thought about making one (just had no idea where to begin to create one). So glad you made this one!! It’s fabulous. Thanks for sharing. 🙂
Love the simplicity of this! Do you have to use home dec fabric or will a lightweight quilting fabric also work?
As for PUL, yes you can tumble dry it, best on low if it will be dried this way lots. I make nappy free time mats with flannelette and PUL and tumble dry on hot for 20 minutes to seal any stitching holes.
You could use a lightweight fabric but I think the heavier home dec fabric helps the pouch retain it’s shape so it’s easier to insert wipes and diapers. If you try it with quilting fabric instead you’ll have to let us know how it turns out!
Thank you so much for sharing this tutorial! I made two of these for two cousins. I’ve posted about it on my blog: https://enchantedbybooks.wordpress.com/2012/12/26/changing-pad-diaper-pouch/
I look forward to browsing your other tutorials! 🙂
Thank you so much for sharing your tutorial! I am a Grandma and love to make things for the babies! This will come in very handy I am sure.
Thank you so much for the tip. This is very unique and seems to be quick. I have a baby shower to attend next week and this will make a fantastic gift.
great idea but can anyone tell me where to get pul from none of the fabric shops here have it
Hi Linda, You can try doing an internet search for “UK PUL fabric” and see what turns up for online shops. I found the Nappy Dashery online store that has some solid color and print options!
Hi Mary: I love this tutorial and am making one right this very minute for a friend’s upcoming baby shower. I have a question which may seem obvious, but just wanted to check before I stitch. I’m using some pink PUL and am assuming that the more plastic-y coated side would be the right side and the fabric-y side would be the wrong side for this changing pad, right? So you would want the wipe-able, plastic-y side facing out on the finished pad, right?
Hi Melissa, I’m glad you’re able to use the tutorial! Yes, the plasticy coated side goes on the outside (the right side) so it can be wiped up easily. You’ll have to share a photo of your finished project!
Hi Mary, Thanks so much for your answer. I will send a photo of the completed project to the email address for Craft Buds. This was such a fun project and I love how it turned out. Hope you do to. Thanks again!
I love this! Exactly what I need to make for my little guy. Question from a non-sewer, how many yard of fabric should I buy to make one of these? And how much PUL and WU will I need? Thank you!!
Hi Kelsey, for the PUL, WU and whatever fabric you use for the top of the changing pad, you’ll need a 24″x14″ rectangle of each. So as long as the fabric you buy is wider than 24″, you’ll need a 14″ cut of each. To be safe, you could just go with 1/2 yard of each (which would be 18″). The diaper pouch is made up of two 21″x8.5″ strips, so a total piece of 21″x17″, so another 1/2 yard (18″) of fabric should be okay for that (as long as the person cutting it doesn’t skimp or cut at an angle). You’ll have enough extra fabric to cut the 9 1/4″ square pocket.
Hi,
I have a question: is this pad cover washable or it is designed to wipe it clean. I wanted to modify your design and use the pad cover with one side (the opposite of the PUL) made of cotton terry to lay the baby down. but then it must be washed, and I was wondering whether it would be possible to wash it. Second idea I had was to use your cover under the mattress pad to protect the mattress from leakage
Thank you very much
Lana
Hi Lana! Great ideas and questions! The changing pad in the tutorial is washable. Both the PUL and home dec fabric were safe to wash, but this was a gift so I only washed it once! PUL is used in cloth diaper covers so I know it holds up to quite a bit of washing. I’d check the washing instructions for whatever specific fabrics you’re considering just to be sure. As for using it for a mattress pad, I don’t know enough about PUL to know about having it close to baby’s face but I have seen rubber sheeting at Joann’s that’s specifically for that purpose: https://www.joann.com/rubber-sheeting-white/zprd_01491315a/
Thanks for the tutorial! I was wondering if you’d also recommend laminated cotton instead of PUL?
Hi Natasha! I haven’t tried it in this kind of project, but I’m guessing that it’ll work just as well. If you give it a try you’ll have to let us know how it turns out!
I can’t wait for someone to have a baby so I can make this!!
How much yardage of all the fabrics and WU do I need to buy for all the pads and pockets?
Thanks, I suck at math!
I was able to get all the elephant pieces (one piece for the changing pad and 2 pieces for the pouch) from 2/3 of a yard of fabric, but a full yard might be safer for prints you want to go in a specific direction. For the rest of the fabrics there’s just one item cut from each. From the wonder under: 24″ x 14″, from the PUL: 24″ x 14″, from the circles fabric for the pocket: 9 1/4″ x 9 1/4″.
Why not make the changing pad a bit longer, and put the pocket at one end. Then just fold up the changing pad when not using.
Thanks for the tutorial, Mary! I made this my first sewing project this summer. Question for you: HOW did you get your sewing for the bias tape so even everywhere? What’s the secret?
Here’s a link to the post I created about my attempt at this pattern. https://rightbrainhappy.blogspot.com/2014/07/secret-project-end.html
Thanks again!
Abigail, thanks so much for the link! I think yours turned out awesome and the bias tape looks great!! My bias tape secret…is that it’s still the bane of my sewing existence, but I’m slowly getting better! Seriously, my first project ever with bias tape had me in tears. Although I’m getting better at sewing slowly and lining it up, it’s still tricky on this project with so many layers. The more you try it the better you’ll get!
I have been coming back to this page for the last two years, this is probably my favourite thing I’ve got from Pinterest, so many of my friends and family have received these as gifts and today I’m finally making myself a new one, the last one last me the whole two years but it’s so grotty I feel terrible putting my new baby down on it. Thanks so much for a wonderful post.
Help, can you iron the web to the fabric side of the poly. I got a diaper cut fabric backed poly on ebay, but Joannes fabric shop has it by the roll.
Hi Chris! I haven’t tried it so I don’t know if it’ll work. You may want to start with a scrap test piece and low heat setting and see what happens.
Love this!! I just made one and it was quick and easy!! The instructions were clear and easy to follow. I used cotton fabric instead of the home decor fabric and if I make this again I will add interfacing to the pouch because it’s a little flimsy. This is perfect because you can get to everything without having to unroll or open anything, it’s all right there. I made a changing pad with pocket when I first had my baby and it’s so difficult to get anything out of because you have to pull the whole thing out of your bag and unroll it just to get the wipes out. This is a much more practical design.